Macro Photography - Getting Closer and Bigger
At some point, you may want to try your hand at taking photographs of objects closer than normally possible. In photography, this is referred to as macro photography or photomacrography. This may be because you have something small you want to photograph, or possibly you want to show more detail in part of a larger object. To do this, you need a means of focusing closer to the object than is normally possible (which increases the apparent magnification). If you do not want to invest in a dedicated macro lens, there are methods and fixtures/attachments which will allow you to do this with your existing lens. At this writing, the price of new Nikon Micro lenses is: 55/2.8 - $335, 60/2.8 - $355, 105/2.8 - $600, and 200/4 - $1250. You may want to try your hand at one of the following methods before investing in these lenses to see if macro is something which will hold your interest. Although the following is directed at Nikon equipment, the general principles apply to any system. I recommend John Shaw's Closeups In Nature ISBN 0-8174-4051-8 for more information on technique. You can visit his site for examples.
Reversing Rings - Allow you to mount your existing lens backwards on your camera. Although it may sound (and look) a little odd, mounting a lens backwards on your camera can allow you to take photographs up to more than 3X life size depending on the focal length of the lens you use. No additional optics are added.
Extension Tubes - The lens is mounted in a normal manner with spacers (extension tubes) mounted between the camera and the lens. The effect of adding extension tubes is to reduce the minimum focusing distance of your lens. As the amount of extension approaches the focal length of the lens, the object being photographed will approach life (1:1) size. The tubes do not have optical elements - no additional optics are added.
Bellows - The lens is mounted in a normal or reversed manner with a bellows (continuously variable extension) mounted between the camera and the lens. The photograph can approach 22X life size depending on the focal length of the lens used and the method of mounting (normal or reversed). Bellows do not have optical elements.
Diopters (Closeup lens) - The lens is mounted normally and optical elements are added to the front of the lens to increase apparent magnification up to 3X life size using only one diopter, more if stacked.
Stacking Lenses (Macro coupler) - The lens is mounted normally and a shorter focal length lens is mounted to it's filter ring in a reversed position (and you thought just the reversing ring made you look odd). In effect, the second lens is an added diopter. Normal magnifications can approach 8X life size.
Common questions Camera shake, MLU, focusing problems, incorrect exposures, etc.
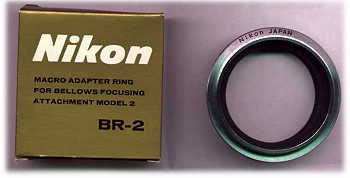
Nikon Macro Adapter Ring BR-2A/BR-5 - Larger than Life
The following describes one method by mounting a lens directly to the camera in the reversed position.
A Macro Adapter Ring is used to mount a lens in the reverse position on a camera body, a bellows attachment or an extension ring. When shooting at reproduction ratios greater than 1X (life size), mounting the lens in reverse improves image quality and increases the working distance from the lens to the subject. The BR-2A can be used with any lens having a 52mm filter thread, however if the lens is to be mounted directly to the camera via the BR-2A, the lens should have a focal length of between 20 and 58mm. For lenses having a 62mm filter thread, it is necessary to use a step down ring (62mm-52mm) BR-5. Typical cost of BR-2A is about $20, step down rings are about $6-$15.
With the BR-2A, you must use the stop-down method of metering.
With the N4004, N5005, N50 and N60 (and their variants) the camera meter coupling does not operate and the exposure indicator lights do not appear.
When the BR-2A is used with a F4 series camera equipped with the Multi-Meter finder DP-20 or AE Section Finder DA-20, exposure compensation is required as shown in the following:
Metering System |
Metering Method |
||
Finder |
Aperture |
Center weight |
Spot |
DP-20 |
< f /5.6 |
No comp. |
+1 |
DP-20 |
f/5.6 |
-1 |
+1 |
DA-20 |
--- |
No comp. |
+1 |
When you mount a lens directly to the camera via the BR-2A, you must move the camera back and forth to focus. The exception to this is zoom lenses, where the zoom ring can be used for fine focusing. When mounting the lens, set the focus adjustment to infinity. The following chart gives the reproduction ration possible with the lens (only Nikkor) shown - you will note that the shorter the lens focal length, the higher the reproduction rate possible.
Note 1 - The BR-5 (or step-down 62mm-52mm ring) is required to mount the lens in reverse.
Note 2 - When mounting the 55mm/2.8 in reverse, avoid strong pressure to the end of the lens nearest the the aperture ring, especially if the focus ring is extended, could cause camera malfunction.
Note 3 - Image quality may deteriorate at the infinity setting.
Auto Focus (AF) Lens |
Reproduction Ratio |
| 20mm/2.8 (SEE NOTE 1) | 3.4X |
| 24mm/2.8 | 2.5X |
| 28mm/2.8 | 2.0X |
| 35mm/2 | 1.4X |
| 50mm/1.4 | 1/1.1X |
| 50mm/1.8 | 1/1.4X |
| Micro 55mm/2.8 (SEE NOTE 2) | 1.2X |
| Micro 60mm/2.8 (SEE NOTE 1) | 1/1.2X |
| 85/1.8 | 1/2.8X |
| Zoom 24-50mm/3.3-4.5 (SEE NOTE 1) | 3.0X - 1.0X |
| Zoom 28-70mm/3.5-4.5 | 2.2X - 1/5.6X |
| Zoom 28-85mm/3.5-4.5 (SEE NOTE 1) | 3.0X - 1/27.5X |
| Zoom 35-70mm/2.8 (SEE NOTE 1) | 2.3X - 1/1.9X |
| Zoom 35-70mm/3.3-4.5 | 2.1X - 1/6.1X |
| Zoom 35-80mm/4-5.6D | 1.7X - 1/18.6X |
| Zoom 35-105mm/3.5-4.5 | 1.8X - 1/6.1X |
| Zoom 35-135mm/3.5-4.5 | 2.2X - 1/31.7X |
| Zoom 70-210mm/4-5.6D (SEE NOTE 1) | 1/1.6X - 1/infinity X |
| Zoom 75-300mm/4.5-5.6 | 1/1.2X - 1/infinity X |
Manual Focus Lenses |
Reproduction Ratio |
| 20mm/2.8 (SEE NOTE 1) | 3.4X |
| 24mm/2 | 2.6X |
| 24mm/2.8 | 2.6X |
| 28mm/2 | 2.2X |
| 28mm/2.8 | 2.1X |
| 35mm/1.4 | 1.8X |
| 35mm/2 | 1.6X |
| 35mm/2.8 | 1.5X |
| 35mm/2.8 PC | 1.6X |
| 50mm/1.2 | 1.1X |
| 50mm/1.4 | 1/1.1X |
| 50mm/1.8 | 1/2X |
| 55mm/2.8 Micro | 1/1.1X |
| 58mm/1.2 Nocturnal | 1/1.2X |
| Zoom 28-85mm/3.5-4.5 (SEE NOTE 1) | 2.9X - 1/35.8X |
| Zoom 35-70mm/3.3-4.5 | 2.1X - 1/6.1X |
| Zoom 35-105mm/3.5-4.5 | 1.8X - 1/6X |
| Zoom 35-135mm/3.5-4.5 (SEE NOTE 1) | 2.2X - 1/14.9X |
| Zoom 35-200mm/3.5-4.5 (SEE NOTE 1) | 2.2X - 1/Infinity X (SEE NOTE 3) |
O.K., so your favorite Nikon lens isn't shown above.
First question - what size is the filter ring? If it's larger than 62mm, are you going to stack step-down rings until it fits? Go ahead, you folks with a 102mm filter size- let me know how you make out, but you'll probably have to move closer to the Sun to get enough light.
Second question - If it's a 52 or 62 mm filter size and if you observe the lenses shown, you can have a rough idea of what to expect. As an example, a 24-120 at the shortest focal length can be expected to provide somewhere in the neighborhood of 2.5X - 3.0X (roughly). Since you're trying to make things bigger on film, you probably won't be using the longer focal length part of the zoom anyway - what would be the point? What is the mathematical equivalent of 1/Infinity ? Plug it into your pocket calculator - small eh? I thought you were trying to get larger, not smaller.
Back to top | Extension Tubes | Bellows | Diopters | Stacking Lenses | Questions
|
Extension tubes are simply fixed length spacers that fit between your camera and lens, they contain no optics. They may be stacked together to provide more extension for longer focal length lenses and can also be used in conjunction with teleconverters to provide closer focusing than possible with a lens/teleconverter combination. Tubes shown are by Kenko and are capable of autofocus. |
Extension tubes offer a convenient, portable way to focus closer than normal. As with all devices in the light path, there is some light loss - normally accounted for by your SLR camera metering system automatically.The amount of light lost is dependant on the focal length of the lens in use and the amount of extension.
..............................................
For example, with the PK-13 tube (27.5mm extension):
On a 28mm lens you lose approx 2 stops
On the 55 micro you lose just over 1 stop
On a 105mm lens you lose about 2/3 stop
On a 200mm lens you lose about 1/3 stop
The mathematics (for those inclined):
light loss = ((extension + focal length) / focal length))^2
stops lost = log2(light loss)
This assumes a simple symmetric lens. Wideangle lenses with retrofocus design (lens is physically much longer than the focal length) will show less light loss due to extension. Long lenses with telephoto design (lens is physically shorter than it's focal length) will show greater light loss.
.......................................................................
Use of a tripod and remote release is recommended as you approach 1:1 ratios. You lose infinity focus when using these tubes
The amount of extension needed to obtain life-size (1:1) reproduction with a normal (not macro) lens is equal to the focal length of the lens. (i.e., for a 50mm lens, 50mm of extension will bring the reproduction rate to 1:1). To calculate the reproduction ratio given a lens focal length and extension, use the formula :
Reproduction ratio = focal length of lens/amount of extension
Example : 100mm lens/50mm extension = 1:2 (or half life size) - the same extension for a 200mm lens would yield 1:4.
For macro lenses, you must take into consideration the amount of apparent extension built into the lens itself. For example, a Nikon 105/2.5 macro lens will go to 1:2 (half life size) by itself, indicating that 52.5mm of extension is already built into the lens. To bring this lens to 1:1, an additional 52.5mm of extension is required. That is the amount of extension offered by the Nikon PN-11 tube, which was designed expressly for that lens. Use the formula :
Reproduction ratio = (focal length of lens - macro extension)/amount of additional extension.
 Nikon PN-11
shown at left.
Nikon PN-11
shown at left.
The following shows Nikon extension tubes and their extension length (All are manual focus only).
Nikon PN-11 - 52.5mm extension, built-in tripod collar - Designed to bring Nikon 105mm micro lens to 1:1.
Nikon PK-11A - 8mm extension
Nikon PK-12 - 14mm extension
Nikon PK-13 - 27.5mm extension - Designed to bring Nikon 55mm micro lens to 1:1
As previously mentioned, Kenko also offers extension tubes (in both manual and autofocus) with the Nikon mount. These tubes come in a set of three that includes a 12mm, 20mm and 36mm (total of 68mm). A 25mm AF tube is also available. By stacking (and unstacking) tubes to match the lens in use, a combination can usually be found that will give the results desired unless greater reproduction ratios are needed. Typical cost of Kenko manual focus set is about $90, AF set is $150.
Note : If you have a Nikon N50, N60, N4004 or N5005 (or their variants), you must use AF capable extension tubes to retain metering capability.
Back to top | Reversing Rings | Bellows | Diopters | Stacking Lenses | Questions
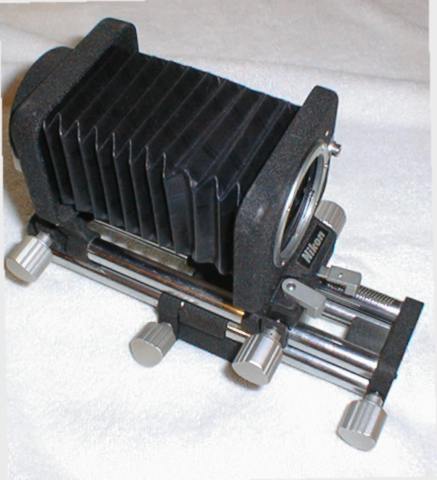
If you read the section on extension tubes above, think of a bellows as a variable length extension tube. Typical cost of bellows is about $220, a double release $40-$65. There are several important considerations when using bellows instead of fixed length extension tubes.
Bellows can give much higher reproduction ratios (up to 11X by themselves, up to 22X with bellows extenders for the PB-6) due to the longer physical length - and - they are continuously variable throughout their adjustment range unlike the fixed length extension tubes.
Bellows are not as portable and as easily held as fixed extension tubes in the field. Focusing becomes extremely critical, any movement can throw focus off - and - use of remote release and tripod is essential.
Note that some (even most) autofocus bodies may not mount directly to the bellows because the body hits the bellows when mounting it. Use a short (12mm) extension tube between the body and the bellows to provide the clearance. Nikon recommends the PK-13 (27.5mm), but that amount of added extension is not generally required - the 12mm tube is available from Kenko.
* The lens mechanism is not coupled through the Nikon bellows as they are with extension tubes, you must use a special 'double' release so the lens and the camera mechanisms work together.
AR-4: FE, FM and F2-series. With optional Nikon release adapter AR-8 it can be used with F3-series, FE2, FM2, FG, FG-20 or EM cameras.
AR-7: F3-series, FA, FE2, FM2, FG, FG-20, FE, FM and EM cameras
AR10: F-501/N2020, F-301/N2000 and FA with motordrive MD-15
Note with AR10:
1) When the AR-10 is connected to the MD-12, the MD-12 will begin firing before the aperture is properly adjusted; do not use the AR-10 with the MD-12
2) In an combination with an F3-series camera with motordrive MD-4, the AR-10 cannot be used, use the AR-7 for single frame shooting only.
3) With the AR-10 connected to the MD-15 and FA camera, the B (bulb) and M250 settings can not be used.
Use one of the following to obtain semi- automatic diaphragm operation:
BR-4 Semiauto Diaphragm Ring - female F-Bayonet, male F-Bayonet , 9mm extension, semi-automatic diaphragm coupled, not meter coupled . This ring provides for a semiautomatic diaphragm when used with Bellows units. It is spring-loaded so that the diaphragm is held open without any pressure from one end of a double-cable release, but stops down to the appropriate aperture when the release is squeezed.
BR-6 Semiauto Diaphragm Ring - female F-Bayonet, male F-Bayonet, 9mm extension, semi-automatic diaphragm coupled, not meter coupled. When using the PB-4 or PB-5 bellows with a double cable release, this ring enables you to retain automatic diaphragm control with PB-4, PB5 and PB6 with AR4/7/10 cable releases. BR-5 allows mounting lens with 62mm thread (use with BR-2A).
Depth of field becomes critical with closeup work. The greater the magnification used, the shallower your depth of field becomes. The old rule of choosing the smallest aperture possible stands true, but only to an extent. At apertures of f/22 or f/16, a loss of general image sharpness can occur through diffraction. So for maximum sharpness, a 'working aperture' of around f/8 is recommended (see table below for exceptions).
It is also interesting to note that for close-up work the area of focus in front of and behind the subject becomes more or less equal rather than one third in front and two thirds behind, as with more distant subjects. So keep this in mind when trying to make the most of your depth of field. The formula used for calculating depth of field for closeup work is as follows:
DOF = (2cf (M+l)) M2
Bellows Reproduction Rates
Note : The following table gives reproduction rates for selected lenses with standard extension bellows. Reproduction ratios that are given below are only approximate values - if exact ratios are desired, determine through experimentation or measurement of extension. (See Extension Tubes and Reversing Rings for formulas)
Lens Type |
Lens Mounting Position |
Approx. Reproduction Ratio |
Remarks |
24mm/f:2.8 |
Reverse |
4X - 11X |
Image is at it's best at f:8 and degenerates as lens is stopped down further. |
28mm/f:3.5 |
Normal |
1X - 3X |
The more the lens is stopped down, the better the image. Desirable for copying. |
28mm/f:3.5 |
Reverse |
4X - 9X |
Image is at it's best at f:8 and degenerates as lens is stopped down further. |
35mm/f:2 |
Normal |
1X - 5X |
The more the lens is stopped down, the better the image. |
35mm/f:2 |
Reverse |
3X - 7X |
Image at it's best at f:8 and degenerates if stopped down further. |
35mm/f:2.8 |
Normal |
1X - 5X |
The more the lens is stopped down, the better the image. |
35mm/f:2.8 |
Reverse |
3X - 7X |
Image is at it's best at f:8 and degenerates if stopped down further. |
35mm/f:2.8 PC |
Normal |
2X - 5X |
The corner image degenerates at low magnification. Unsuitable for copying. |
35mm/f:2.8 PC |
Reverse |
3X - 7X |
Image is at it's best at f:8 and degenerates if stopped down further. |
45mm/f:2.8 GN |
Normal |
1X - 4X |
Image is at it's best from f:8 - f:11 and degenerates if stopped down further than f:11. |
45mm/f:2.8 GN |
Reverse |
2X - 5X |
Image is it's at best at f:8 and degenerates if stopped down further. |
50mm/f:1.4 |
Normal |
1X - 4X |
The more the lens is stopped down, the better the image. Unsuitable for copying. |
50mm/f:1.4 |
Reverse |
2X - 5X |
Corner image degenerates at low magnification. |
50mm/f:2 |
Normal |
1X - 4X |
The more the lens is stopped down, the better the image. |
50mm/f:2 |
Reverse |
2X - 5X |
At high magnification, corner image degenerates when stopped down further than f:8 |
55mm/f:1.2 |
Normal |
1X - 4X |
Stop down as far as possible for better corners. Unsuitable for copying, OK for general. |
55mm/f:1.2 |
Reverse |
2X - 5X |
Corners degenerate at low magnifications. |
55mm/f:3.5 Micro |
Normal |
1X - 4X |
Image is at it's best by f:8 and degenerates as lens is stopped down further. |
55mm/f:3.5 Micro |
Reverse |
2X - 5X |
Image is at it's best by f:8 and degenerates as lens is stopped down further. |
85mm/f:1.8 |
Normal |
�X - 3X |
The more the lens is stopped down, the better the image. |
85mm/f:1.8 |
Reverse |
�X - 3X |
Corners degenerate at low magnifications. |
105mm/f:2.5 |
Normal |
�X - 2X |
The more the lens is stopped down, the better the image. |
105mm/f:2.5 |
Reverse |
1/inf - 1X |
Good image at high magnifications, corners degenerate at infinity. |
135mm/f:2.8 |
Normal |
1/3X - 1X |
The more the lens is stopped down, the better the image. |
135mm/f:2.8 |
Reverse |
1/inf - 1X |
Good image at high magnifications, corners degenerate at infinity. |
135mm/f:3.5 |
Normal |
1/3X - 1X |
The more the lens is stopped down, the better the image. |
135mm/f:3.5 |
Reverse |
1/inf - 1X |
Good image at high magnifications, corners degenerate at infinity. |
105mm/f:4 Bellows |
Normal |
1/inf - 1X |
The more the lens is stopped down, the better the image. |
200mm/f:4 |
Normal |
1/5X - 1X |
The more the lens is stopped down, the better the image. |
300mm/f:4.5 |
Normal |
1/10X - 1X |
The more the lens is stopped down, the better the image. |
Back to top | Reversing Rings | Extension tubes | Diopters | Stacking Lenses | Questions
Diopters are perhaps the easiest (portable and convenient) way to get closer with more magnification in the field besides extension tubes, but you may pay a price in picture quality, particularly with the single element diopters. They mount by screwing them into the filter ring of your existing lens and provide magnification through the use of optics that augment the existing optics in your lens. Nikon's diopters come in 2 filter sizes, 52mm and 62mm. Adapter rings can allow fitting these to other size filter threads, but at a risk of vignetting. Typical cost of a diopter is about $33-$43.
The following are Nikon single element diopters.
The following are 2 element diopters, they are for use on lenses with focal lengths between 80mm and 200mm.
Diopters may be stacked on top of each other for added magnification. When stacking diopters, always place the strongest diopter closest to the lens.
Back to top | Reversing Rings | Extension tubes | Bellows | Stacking Lenses | Questions
Stacking Lenses (Macro couplers)
Lens stacking has the same effect as using diopter or closeup lenses. A longer focal length lens is mounted on the camera and a shorter focal length lens is reverse mounted to it's filter ring using a lens stacking ring (macro coupler). Macro couplers come in a variety of sizes (52mm to 52mm, 52mm to 58mm, etc.) and at a typical cost of $8-$10, these couplers offer an introduction to macro that is very affordable.
Magnification factor = Focal length of main lens / Focal length of reversed lens
3 Examples
200mm / 105mm = approx. 2X magnification
200mm / 50mm = approx. 4X magnification
200mm / 24mm = approx. 8X magnification
Experimentation with your existing lenses will show what combination gives you the best pairing for your needs, but in general the following applies:
Back to top | Reversing Rings | Extension tubes | Bellows | Questions
1. I don't have a remote shutter release capability or MLU (Mirror Lock-Up) on my camera, how do I make long exposures without camera shake?
Depending on the camera body, you may be able to use the camera's self timer provided. On some bodies, setting the self timer locks up the mirror when the timer is set, the shutter is released when the timer expires. If you are having problems with camera shake, this is worth a try. You can also try adding sand bags to your setup to reduce vibration.
2. The focusing screen prism 'blacks out' on my camera when I try to close focus, what can be done?
3. My exposures are off, what am I doing wrong?
Did you cover the eyepiece ? This is often overlooked and can lead to incorrect exposures when ambient light enters the viewer from the rear, thereby affecting the light meter reading. This is not a problem if you are using manual settings (aperture and shutter speed), but can be a problem if you are using an automated exposure (such as aperture priority) mode and do not have your eye up to the viewer when taking exposures. If that's not the problem, you'll have to send me an email fully describing your setup.
Back to top | Reversing Rings | Extension tubes | Bellows | Stacking Lenses
Date last edited : Wednesday, February 07, 2001
