|
|
Last update: 4/28/03 |
||||
| How Digital Cameras Work From light to bits, here's how digital cameras do the conversion. |
Add a comment or send Thom feedback on this article. | ||||
|
From the number of emails I receive and posts on various digital camera user groups, it seems that many digital camera users still don't know how the primary function of their camera works. It doesn't help to have representatives from camera companies:
It's important to understand how CCDs function if you want to get the best possible results from your camera. So I'll step you through what happens, and the issues associated with a number of practical problems you'll encounter. |
What's the Beef? |
||||
|
The lens in a camera focuses light on a plane behind the rear element. In 35mm cameras, that plane contains film. In digital cameras, the plane is occupied by a piece of silicon (chip) which I'll refer to as the sensor. Sensors come in two primary types: CCD (charge-coupled device) and CMOS (complimentary metal oxide). On this sensor are an array of light-sensitive spots, called photosites. Photosites are usually square in shape (currently there are two major exceptions that I'll deal with in a moment), and laid out in rows and columns. The first thing that catches newcomers to digital cameras unaware is this: photosites do not necessarily cover the entire surface area of the sensor. With some sensors the active light gathering area is only 25% of the total surface area of the chip. Yes, that means that there is often non-light responsive space between adjacent photosites. (Pictures you might see of sensors that show adjacent red, blue and green positions are usually of an array of microlenses and filters that lie on top of the actual sensor.) I said there were exceptions to the square photosite rule. They are:
You might wonder just how large the individual photosites are. On a D1, they're 11.8 microns square. On a Coolpix 990, they're 3.45 microns square. Most SLR-type bodies have photosites that are at least 7 microns square. Most consumer digital cameras have photosites in the 3-4 micron square range.
|
|
||||
Dark Current and Well OverflowA photosite essentially converts the energy from a light wave into photo-electrons. The longer a photosite is exposed to light, the more photo-electrons it accumulates. To some degree, photosite size is directly related to effective ISO sensitivity, as the larger surface area exposes it to more light waves in any given amount of time than a smaller surface would. (In practice, many of the smaller sensors tolerate a higher noise level to match ISO values with larger sensors.) The physical size of the individual photosites is important beyond effective ISO. The larger the active light gathering surface, the less noise is a problem. That's because every piece of silicon has a baseline level of electron "action" (current). In sensors, this current is usually called Dark Current or Dark Noise (the "dark" in the name implies that the current was formed despite no exposure to light). (There are actually several different underlying types of on-chip noise, but for simplification, I'll just refer to Dark Current in this article.) Dark Current increases with temperature (remember your basic physics? Electrons get more active with heat). Fortunately, it takes really hot temperatures to increase Dark Current to visible, troublesome noise (typically 90 degrees Fahrenheit or higher coupled with long shutter speeds, at least for the smaller Sony sensors used in the Coolpix and most other consumer cameras). At very long shutter speeds (usually 1 second or longer) some of this electron activity can result in "hot pixels," essentially generated by photosites that prove "sticky" to those wandering electrons. The longer the shutter speed or higher the temperature, the more likely you'll see some hot pixels in your image. Every digital camera attempts to deal with dark current by "masking off" a set of photosites so that they don't see light (which is part of the explanation why your 3.34-megapixel camera only produces images with 3.15 megapixels). Your camera's brains compares the values it sees from photosites that weren't exposed to light to those that were. Dark Current is partially random. So, in the most simplistic form, the camera averages all the values found in the masked off photosites and subtracts that from the values seen by the photosites exposed to light to remove the Dark Current. Many current production digital cameras go further than that, however. Individual photosites can and do have slightly different responses to light and to current, so many modern cameras do something a bit different on long exposures (the Canon D30, D60, Coolpix 995 and later, D100, for example): they take two pictures with the photosite array, one exposed to light and one not. Then the pattern seen in the exposure without light is subtracted from the one for the exposure exposed to light. (You can do this yourself, by the way. When you take a picture in low light with long shutter speeds, especially in warmer temperatures, put the lens cap on and take another shot at exactly the same shutter speed. In Photoshop you can use the second exposure to remove patterned noise from the first.) At the other end of the spectrum, what happens to a photosite when it contains too many photo-electrons (due to too much exposure to light)? Well, if left to its own devices, the information (electrons) can spill from one photosite to another, corrupting the data in the adjacent site (a concept called "blooming," or well overflow). This is especially true in the physically small photosites of the Sony sensors used in Coolpix models (proximity makes it easier for an electron to escape from its current owner to another). If you've seen a purple fringe at the edge of boundaries between bright pixels (typically sky) and dark (say the branches of a tree), then you've seen this (and some related) problem. Most sensors have "drain" circuits that attempt to remove excess electrons before they degrade the chip's data too badly, but these circuits are far from perfect, and it's possible to overload them, as well.
|
|
||||
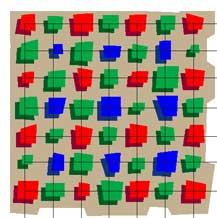
Your Digital Camera Sees in Black and WhiteIt may surprise you to find out that the sensor in your camera reacts to all light with relative equality, essentially rendering it a black and white device. Each individual photosite simply collects only the amount of light hitting it and passes that data on; no color information is collected. Thus, a bare sensor is a monochromatic device. Plenty of ways exist to make monochromatic information into color data. For example, you could split the light coming through the lens to three different sensors, each of which was tuned to react to a certain light spectrum. But most digital cameras use a different method: they place an array of colored filters over the photosites. Two filter arrays are commonly used:
Each of these methods has advantages and disadvantages. The repeat of the green filter (and addition of a green filter to the subtractive method) is due partly to the fact that our eyes are most sensitive to small changes in green wavelengths. By repeating (or adding) this color in the filter, the accuracy of the luminance data in the critical area where our eyes are most sensitive is slightly improved. So, each individual photosite has a filter above that limits the spectrum of light it sees. Later in the picture-taking process, the camera integrates the various color information into full-color data for individual pixels (a process usually called interpolation, but more accurately called demosaicing). But one important point should be made: the color accuracy of your digital camera is significantly influenced by the quality of the filter array that sits on top of the photosites. Imagine, for a moment, a filter array where each red filter was slightly different--you'd have random information in the red channel of your resulting image. A damaged filter would result in inaccurate color information at the damage point. One thing that isn't immediately apparent about the Bayer pattern filter is that the ultimate resolution of color boundaries varies. Consider a diagonal boundary between a pure red and a pure black object in a scene. Black is defined as the absence of light reaching the sensor, thus the data value would be 0 (for the G and B photosites). That means that only the photosites under the red sensors are getting any useful information! Fortunately, pure red/black and blue/black transitions don't occur as often as you'd think, but it is something to watch out for. (Since no individual color is repeated in a CYMG pattern, all boundaries should render the same, regardless of colors.) Most sensors these days are built with microlenses that incorporate the filter pattern directly on top of the photosite portions. This microlens layer not only incorporates the Bayer filter pattern, but redirects light rays that hit at an angle to hit more perpendicular to the photosites. If light were to hit the photosites at severe angles, not only would the photosite be less likely to get an accurate count of the light hitting it, but adjacent cells would tend to be more influenced by the energy (like Newton's laws suggest, light waves don't tend to change direction unless acted upon by something). All Nikon cameras currently use microlens layers; the Kodak DCS Pro 14n is unusual in that it apparently doesn't. On top of the microlenses are also another set of filters that take out some of the infrared (IR) light spectrum and provide anti-aliasing (I'll discuss anti-aliasing in the next section). Sensors tend to have the ability to image well out of the visible spectrum and into the infrared (typically they are still highly reactive at 1000nm--I've seen spectral charts for at least one chip that shows it is actually more responsive to near infrared than visible light). On the Nikon Coolpix models, the 950's IR filter lets in more of the infrared spectrum than does the filter on the 990 (the 995 seems similar to the 990 in my early tests). (The filter that takes out IR is sometimes referred to as a "hot mirror" filter.) One other thing to note about most sensors: they are not particularly sensitive to low wavelengths. At the blue end of the visible spectrum (~400-500nm) they may have less than half the normalized response to light than at the green level (~500-600nm). In the UV spectrum, most sensors are barely reactive. The reduced response of the blue photosites can contribute to a noise problem, though this is well handled by most current cameras. Nevertheless, I do see considerable changes to color neutrality with some digital cameras using UV filters on the lens. The Fujifilm S2 Pro, for example, tends to get purer whites if you use an UV filter, for example.
|
Actually, when I talk about "red," "green," or "blue" filters (or any other color, for that matter), the filter itself may not actually be those colors. Typically those are the color or light that is let through the filter. E.g., a "green" filter lets green spectrum light through to the sensor and removes "blue" and "red" light.
Demosaicing is a word you probably won't find in your dictionary. The filter pattern is a "mosaic" of colors. The routine that deciphers that mosaic performs a de-mosaic action on the data, thus the routine is called demosaicing. The simplest and most often used demosaicing routine works this way: (1) record the existing R, G, or B value at each pixel position; (2) invent new G values at each of the R and B photosite positions, often using a multiple pass technique to figure out where edges occur; and (3) fill in the missing R and B values using neighbor sampling techniques. Hundreds of other variants are now extent, with most trying to deal with the minor artifacting issues created by simple routines.
The lower blue response is a problem with incandescent light (the most common indoor lighting type), as that light source doesn't produce much blue spectrum. Indeed, one complaint about some recent cameras (the Fuji S2 being one of them) is that their blue channel noise levels can be quite high in some incandescent lit situations.
|
||||
Getting Data Off the SensorAt this point,
we have an array of filtered photosites that respond to different colored
light that usually looks something like this: The data at each of the individual photosites, by the way, is still in analog form (the number of electrons in the well). The method by which that data is retrieved may surprise you, however: in most CCD sensors the values are rapidly shifted one line at a time to the edge of the sensor. This process is called an interline (or row) transfer, and the pathways that the data moves down are one of the reasons why photosites have space between them (to make room for the pathway). While the data is moved off in "rows," it's important to note the short axis is usually the direction that the data is moved (if you're looking at a horizontal image, you'd see these as columns). (CMOS sensors, such as those used in the Canon D30, D60, 10D, 1Ds and a few other newer cameras are unique, in that the data for each individual sensor can be retrieved directly.) As the data gets to the edge of the sensor, it is usually first processed to reduce noise, then read by A/D converters (ADC). Now what we have are a series of digital values (8-bit for many Coolpix and consumer cameras, 12-bit for most SLR models). One common misconception is that bit depth equates to dynamic range (the range of dark to bright light that can be captured). This isn't really true. Dynamic range of a camera is determined mostly by the sensor. If you put a 4-bit, 8-bit, 12-bit, and 16-bit A/D converter on the same chip, the sensor wouldn't respond to low or bright levels of light any differently; you'd only get more or less tonal range in the conversion. At this point, we have one-third the data we need for a complete color picture (we need red, green, and blue values at each photosite location, and we have only one of those values). Here comes the tricky part: a processor (a Sparc-based computer in most Coolpix models) looks at blocks of this data and tries to guess the actual RGB color value of each pixel by comparing adjacencies! (The demosaicing I mentioned above. The right-hand column above shows a typical demosaicing algorithm.) Consider a GB row that was exposed to sky, for example. The blue photosite values across that row might be the same (or change slowly over distance). That would make it relatively simple to guess that the green photosites on that same row would have very similar blue values. You could simply average the two adjacent blue values to give a green photosite its blue component (and vice versa). This, of course, is a very simple case, but it illustrates how the camera's software has to function: it examines a block of adjacent pixels and uses that data to build the missing two values for each location. Again, this process is often called interpolation, though the software routine that does this is more correctly called demosaicing. Camera manufacturers are extremely secretive about their demosaicing methods. But given the unclassified data on image processing and the fact that virtually all cameras are pressed for computational power when confronted with huge amounts of data, it's likely that they examine 3 x 3 blocks (5 x 5 is another common pattern, much more rare would be 8x8). You should know a couple of things about demosaicing (we're about to talk about anti-aliasing, which I promised earlier):
A couple of other points should be made:
|
Dynamic range can also be captured logarithmically, another reason why the number of bits doesn't directly equate to dynamic range.
The Foveon X3 chip used in the Sigma SD-9 camera is unique in that it doesn't use a filter pattern over the sensor. Red, green, and blue data is generated by different layers in each photosite, so each photosite location actually does produce an RGB value on the Foveon chip.
Fujifilm's Super CCD orientation, while different than traditional CCDs, still requires interpolation, regardless of what Fujifilm claims. Because of the angular layout, however, the interpolation has a slightly different (and arguably better) set of data to work from. |
||||
|
Best Book for Photographers While I was browsing my bookshelf double-checking some of my material in this report, I pulled out The Manual of Photography Ninth Edition, the highly technical and math-filled volume that defines much of the state-of-the-art. (MoP is highly recommended, by the way. It's one of those books that you pull out and read sections of from time to time when you want to know the underlying theory behind something, like depth of field or fast Fourier transforms.) Much has been said about when (or whether) digital imaging will pass film in the ability to resolve information. I came upon this interesting passage (the culmination of several paragraphs of theory and math): "It would appear that the digital system has overtaken the photographic process with respect to this [information capacity of images] measure of performance." Note that this says nothing about resolution, only the theoretical amount of "information" contained in an image. |
|||||
|
|