 |
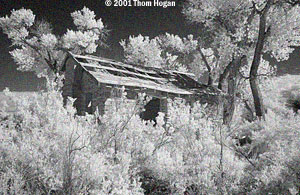
Near
Hanksville, Utah, taken during one of my workshops. D1x, Nikkor 20mm
f/2.8 with Hoya 72 infrared filter. 5 second exposure (which generated
noise in the dark areas). Brought into Photoshop, curves applied,
slightly sharpened, then a more patterned noise added using Texture.
|
Infrared
is a spectrum of light beyond that which we normally see. Despite having
an IR blocking filter installed between the lens and the CCD, most digital
cameras still react to infrared energy, though at levels far lower than
visible light. To take “infrared” pictures—i.e., photos
primarily made up of near infrared energy—you need to filter out
the visible light and only allow the infrared spectrum through to the
lens. The easiest way to do this is to use a Wratten filter, which you
can find at most professional camera shops (see sidebar at right).
The Wratten
series (and other dedicated infrared filters) are very dense filters,
nearly opaque. Because they block most of the light, you’ll need
very long exposures, so you’ll want to use a tripod.
Generally
you should set your camera to B&W mode, as infrared filters remove
most of the usable color information (it is amusing to bring a color infrared
image into Photoshop and run Auto Levels on it, however). Also, note that
incandescent lamps don’t put out much infrared (heat is thermal energy,
not infrared), so you’ll probably want to start your experiments
with landscapes. One other problem you’ll discover is that once you
filter all the visible light, exposure times will be quite long. On a
Coolpix 950 I get 1/2 second exposures or longer, while on my D1x I find
my exposures are often measured in seconds.
Here’s
one set of steps to try:
- Focus.
Once the filter is on, you won't be seeing much of anything until after
the exposure, so focus is your first priority. Infrared light focuses
at a slightly different point than visible light, so make sure that
you use an aperture in Step 6 that has a decent depth of field.
- Place
the infrared filter in front of the lens.
- Set
the camera to manual exposure mode. I've found that the meter in
most Nikon cameras, at best, does only a fair job of infrared exposures.
On a D1, I almost always have to set exposure manually to get the proper
exposure.
- Set
the camera to shoot B&W only.
Optional: you can perform this step later; but it's easier to evaluate
exposure with the camera set to B&W if that's how you'll print the
image.
- Set
the camera to a higher ISO rating than usual.
I usually set ISO 400 on my D1x. You'll be balancing ISO-generated noise
with long shutter speed generated noise. On a D1, try to keep your exposures
under 5 seconds; on a Coolpix, try to keep them under 2 seconds.
- Set
the exposure. Take a test exposure and examine the histogram. Since
you're usually printing the final image in black and white you'll need
a wide histogram that ranges from nearly pure blacks to nearly pure
whites. Be careful at the bright end, however--foliage has a tendency
to go to white in infrared, and you must retain enough working room
to keep detail (e.g., don't let the histogram extend off the right side!).
Adjust your exposure until you've got the broadest, workable histogram.
- Take
your shot!
Once you’ve
taken an infrared shot, you’ll probably want to manipulate it a bit
to make it better emulate the look of infrared film, which has unusual
"color" (white foliage, for example) and a bit of graininess
and bloom to edges. With Photoshop, try the following:
- Remove
the color, if any. If you’re working with a color image, select
Desaturate from the Adjust submenu on the Image
menu. Alternatively, you can also choose Grayscale from the Mode
submenu on the Image menu, but this doesn't generate the best
results.
- Balance
the image levels. The picture directly from your camera may look
strange, as, despite your exposure efforts, it may still have most of
the image data all bunched up at one or both ends of brightness range.
Novices: select Auto Levels from the Adjust submenu on
the Image menu. If you’re an advanced Photoshop user and
want to preserve image data and get finer control, select Curves
instead of Auto Levels, and adjust manually.
- Sharpen
the edges. The results so far will probably be a bit soft, so select
Unsharp Mask from the Filter menu. Try starting at values
of 100 for Amount, 2 for Radius, and 1 for Threshold, and then tweak
as desired. Better still: use the Smart-Edge technique I describe in
my Sharpening article.
- Make
it look grainy. Traditional infrared film is sharp, but grainy.
To add grain, choose Add Noise from the Noise submenu
on the Filter menu. Start with values of 20% and Uniform and
tweak as desired. Alternatively, select Grain from the Texture
submenu on the Filter menu. Start with values of Soft, 15% Intensity,
and 50% Contrast and tweak as desired.
- Add
edge glow. Traditional black and white film tends to have an unnatural
glow around edges, especially bright ones. Select Diffuse Glow
from the Distort submenu on the Filter menu. Start with
values of 6 for Graininess, 5 for Glow Amount, and 20 for Clear Amount.
Tip:
Try these Photoshop steps with a regular, non-infrared image. You might
be surprised by the results! (hint: before converting the image to black
and white, try modifying the color channels individually, by lightening
the red channel and darkening the blue.)
|
D1 Infrared
D1
users have a wide choice of dedicated infrared filters, in a range of
sizes. I've tried a number, but I like the Hoya 72 best. Generally, the
number in the filter name is an indication of the cutoff point
for visible light--in this case, 720 nanometers, which is decidedly in
the visible red range. The higher the cutoff, the more the filter ignores
visible light. B&W, Tiffen, and Hoya all make several infrared filter
variants in most Nikon lens thread sizes. While pricey, these are high
quality filters that will last you a lifetime.
Coolpix Infrared
28mm
screw-in infrared filters are hard to find. You could hold a larger one
over the lens manually. But if you want a Coolpix-sized filter, check
out Harrison and Harrison. Unfortunately, they don’t have a Web ordering
system yet, so the best bet is to call them at (559) 782-0121.
Newer
Coolpix models (990 and later) are less sensitive to infrared than earlier
models (900 and 950). Use a Wratten 89B or equivalent on a 990, 995, 880,
or 885; use a Wratten 87, 87C, or 88a on the 900 or 950.
|